Learning how to use wax hair removal at home can transform your grooming routine, saving you hundreds of dollars while giving you the freedom to maintain smooth, hair-free skin on your own schedule. With the right technique, quality products, and proper preparation, you can achieve professional salon results from the comfort and privacy of your own home.
Home waxing involves heating wax to the proper temperature, applying it in the direction of hair growth, and removing it quickly against the growth direction to pull hair from the root. Success depends on proper preparation, correct technique, and appropriate aftercare.
Whether you’re a complete beginner exploring different types of wax hair removal or someone looking to perfect your home waxing technique, this comprehensive guide will walk you through every step of the process. From selecting the right equipment to mastering professional techniques, you’ll learn everything needed to wax safely and effectively at home.
Essential Equipment and Supplies for Home Waxing
Basic Waxing Kit Components
Before beginning your home waxing journey, assembling the right equipment is crucial for both safety and effectiveness. A well-equipped setup makes the difference between frustrating attempts and smooth, professional results.
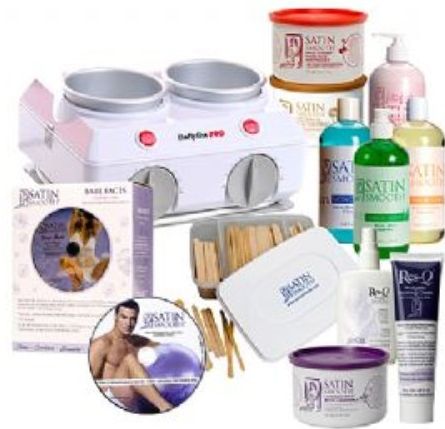
Wax Warmer or Heating Device: The foundation of home waxing is a reliable heating system. Professional wax warmers maintain consistent temperatures and prevent overheating, which is essential for safety and effectiveness. The Tress Wellness Waxing Kit includes a quality warmer along with everything else you need to get started.
High-Quality Wax: Choose appropriate wax types for different body areas. For beginners, starting with a comprehensive waxing kit that includes multiple wax types allows you to discover what works best for your needs.
Application Tools: Wooden spatulas or applicator sticks in various sizes for different body areas. Small spatulas work well for facial areas, while larger ones are efficient for legs and arms.
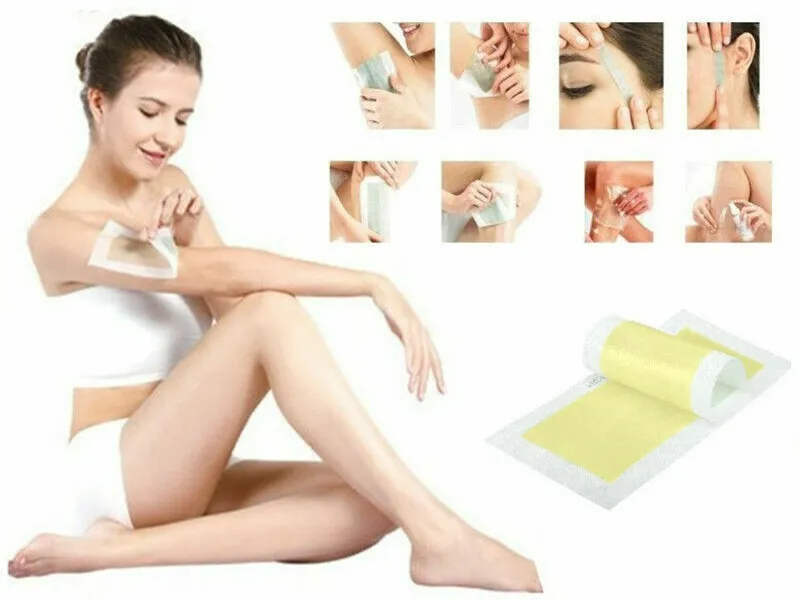
Removal Strips: If using soft wax, high-quality cloth or muslin strips are essential. Pre-cut strips save time, but you can also cut your own from muslin fabric.
Pre and Post-Care Products: Cleanser, pre-wax oil or powder, and soothing post-wax lotion or gel.
Professional-Grade Home Setup
For those serious about achieving salon-quality results, investing in professional-grade equipment pays dividends in both safety and effectiveness:
Digital Wax Warmer: Features precise temperature control and automatic shut-off for safety.
Multiple Wax Types: Hard wax for sensitive areas, soft wax for large areas, and specialty formulations for specific needs.
Professional Tools: Various spatula sizes, high-quality strips, and precision instruments for detailed work.
Complete Care System: Pre-wax cleansers, numbing sprays, and comprehensive aftercare products.
| Equipment Category | Essential Items | Professional Upgrades | Budget Alternative |
|---|---|---|---|
| Heating | Basic wax warmer | Digital temperature control | Microwave heating |
| Wax | Soft and hard wax | Professional wax beans | Ready-to-use strips |
| Application | Wooden spatulas | Multiple spatula sizes | Disposable applicators |
| Removal | Cloth strips | Professional muslin strips | Pre-made wax strips |
| Care Products | Basic cleanser and lotion | Complete care system | Household alternatives |
Pre-Waxing Preparation: Setting Yourself Up for Success
Skin and Hair Preparation
Proper preparation is the foundation of successful home waxing. Taking time to prepare your skin and hair correctly can mean the difference between effective hair removal and painful, incomplete results.
Hair Length Optimization: Hair should be 1/4 to 1/2 inch long for optimal waxing results. Hair that’s too short won’t provide enough surface for the wax to grip, while hair that’s too long can cause unnecessary pain and breakage. If your hair is too long, trim it to the appropriate length 2-3 days before waxing.
Exfoliation Protocol: Gently exfoliate the area 24-48 hours before waxing using a body scrub or exfoliating mitt. This removes dead skin cells and helps prevent ingrown hairs. Avoid exfoliating on the day of waxing, as this can increase skin sensitivity.
Cleansing and Drying: On waxing day, thoroughly cleanse the area with a gentle, oil-free cleanser to remove lotions, deodorants, and natural oils that could interfere with wax adhesion. Ensure the skin is completely dry before applying wax.
Pre-Wax Powder: Apply a light dusting of talcum powder or cornstarch to the area. This absorbs any remaining moisture and oils, helping the wax adhere better to the hair rather than the skin.
Mental and Physical Preparation
Pain Management: Consider taking an over-the-counter pain reliever 30-45 minutes before waxing if you’re sensitive to discomfort. Avoid alcohol, which can increase skin sensitivity.
Timing Considerations: Plan your waxing session for a time when you won’t be rushed. Allow 1-3 hours depending on the areas you’re treating. Many people find late evening ideal, as this gives skin time to recover overnight.
Environment Setup: Choose a well-lit, comfortable space with easy cleanup capabilities. Bathroom or bedroom areas work well. Ensure good ventilation and comfortable temperature.
Stress Reduction: Being relaxed helps minimize discomfort. Consider playing calming music or practicing deep breathing exercises before beginning.
Step-by-Step Waxing Process
Phase 1: Setup and Safety Checks
Equipment Verification: Ensure all tools are clean and within easy reach. Test your wax warmer to confirm it’s working properly and maintaining consistent temperature.
Safety Preparation: Have a damp cloth nearby for quick cleanup and aloe vera gel or soothing lotion ready for immediate post-wax care.
Temperature Testing: Always test wax temperature on a small, inconspicuous area before full application. The wax should feel warm but not burning hot.
Area Selection: Start with less sensitive areas like legs or arms to build confidence before moving to more sensitive zones.
Phase 2: Wax Application Technique
Soft Wax Method:
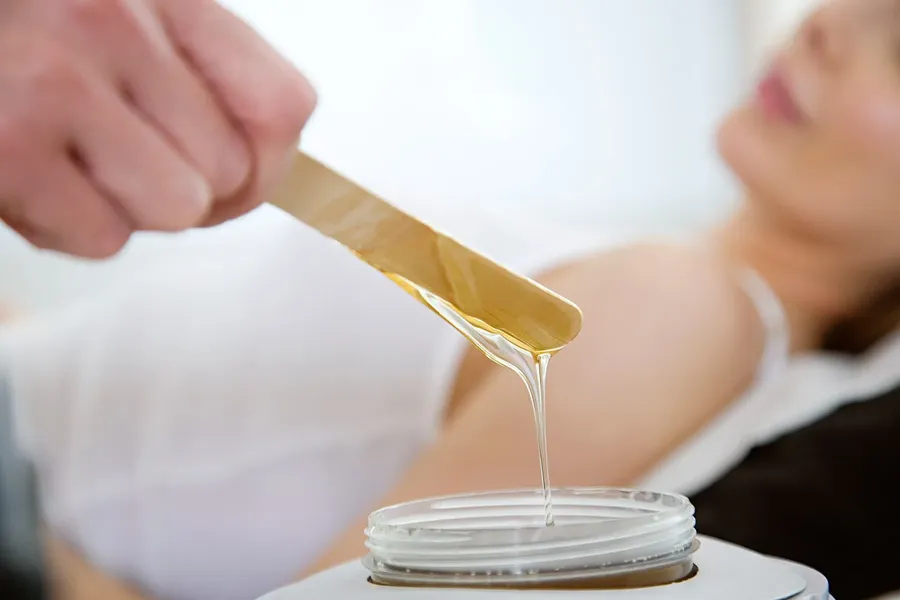
- Heat Management: Warm soft wax to honey-like consistency. It should spread smoothly without being runny.
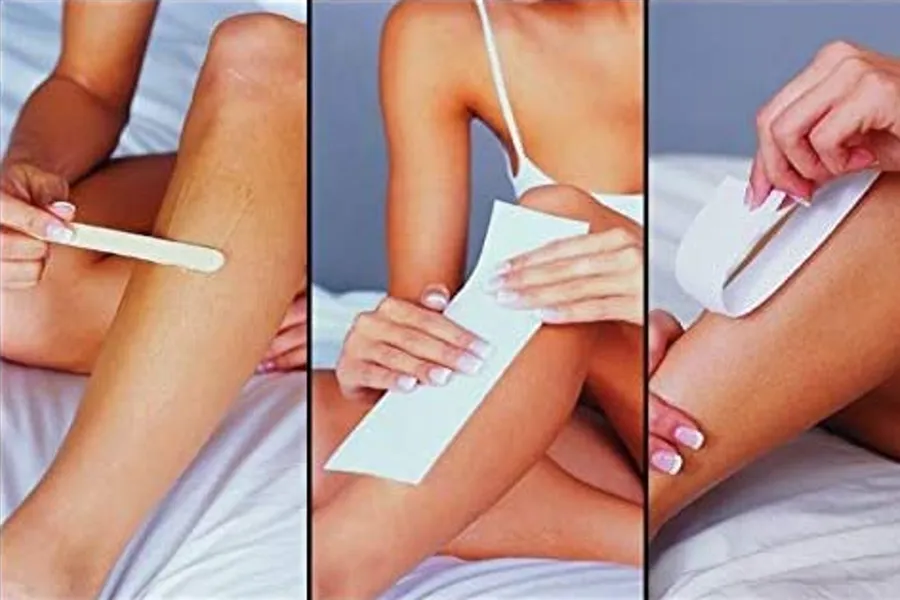
- Application Direction: Using a spatula, apply wax in the direction of hair growth in smooth, even strokes. Create a thin, even layer that covers all hair in the section.
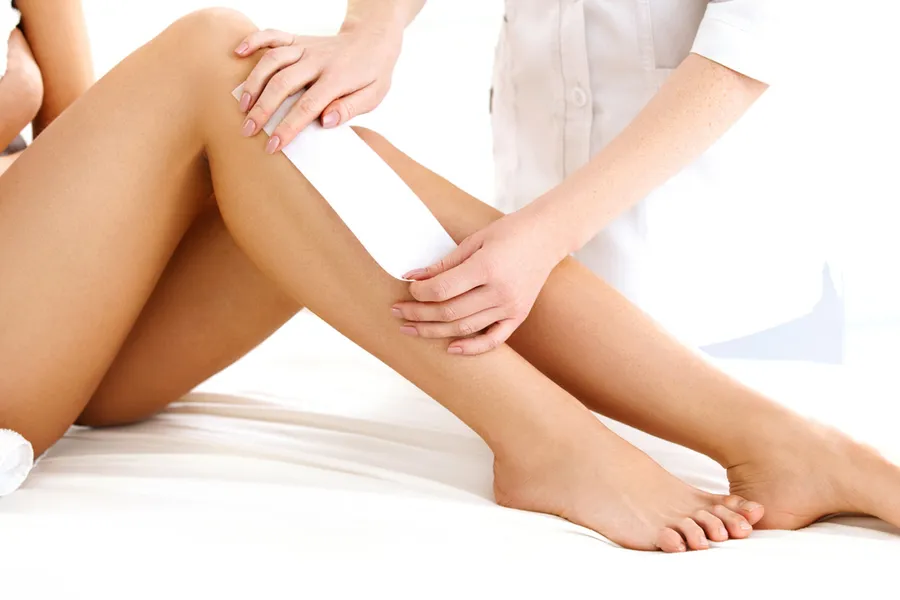
- Strip Placement: Immediately place a cloth strip over the wax, leaving about an inch of strip extending beyond the wax for gripping. Press firmly and smooth in the direction of hair growth.
- Removal Technique: Hold skin taut with one hand. With the other hand, grip the end of the strip and pull quickly in one smooth motion against the direction of hair growth, keeping the strip parallel to the skin.
Hard Wax Method:
- Temperature Control: Heat hard wax slightly warmer than soft wax. It should coat hair completely without dripping.
- Thick Application: Apply hard wax thicker than soft wax (about the thickness of a nickel) in the direction of hair growth.
- Edge Creation: Create a thick “lip” or edge at the end of your application that you can grip for removal.
- Cooling Time: Allow the wax to cool and harden completely (30-60 seconds). It should feel firm but not brittle.
- Removal Process: Grip the thick edge and pull quickly against the direction of hair growth, keeping the wax parallel to the skin.
Phase 3: Section-by-Section Technique
Work in Small Sections: Never attempt to wax large areas at once. Work in sections no larger than 2-3 inches to maintain control and effectiveness.
Pattern Strategy: Develop a systematic approach to ensure you don’t miss areas or overlap excessively. For legs, many people work from ankle to knee, then knee to thigh.
Immediate Assessment: After each section, check for missed hairs and address them immediately while the area is still prepared.
Skin Care Between Sections: Apply soothing lotion or aloe vera gel to completed sections to minimize irritation as you continue.
Body Area-Specific Techniques
Leg Waxing: The Foundation Skill
Legs provide an excellent starting point for home waxing because the skin is relatively resilient and the area is easy to reach and see.
Positioning: Sit on a comfortable chair or bed edge with good lighting. For lower legs, place your foot on a stool or chair for better access.
Section Strategy: Divide each leg into manageable sections: shin, calf, front thigh, back thigh. Work systematically through each area.
Direction Awareness: Pay attention to hair growth patterns, which may change direction in different areas of the leg.
Common Challenges: The area behind the knee and around the ankle require extra care due to sensitive skin and irregular contours.
Underarm Waxing: Managing Sensitivity
Underarm waxing requires special consideration due to the sensitive nature of the skin and the multiple directions of hair growth in this area.
Hair Growth Patterns: Underarm hair typically grows in multiple directions. You may need to apply wax in different directions within the same area.
Hard Wax Preference: Most people find hard wax more comfortable for underarm areas due to its gentler nature.
Small Sections: Work in very small sections (1-2 inches) due to the curved nature of the underarm area.
Skin Tension: Raise your arm overhead and use your free hand to keep the skin taut during removal.
Facial Hair Removal: Precision and Care
Facial waxing requires the utmost precision and gentle technique due to the delicate nature of facial skin.
Product Selection: Use wax specifically formulated for facial use, or use hard wax in very small amounts.
Patch Testing: Always perform a patch test 24-48 hours before facial waxing, even with products you’ve used elsewhere.
Eyebrow Shaping: For detailed eyebrow waxing techniques, work with very small amounts of wax and remove only a few hairs at a time.
Upper Lip Care: This area is particularly sensitive. Use the minimum amount of wax necessary and work quickly but carefully.
Bikini Area: Advanced Technique
Bikini area waxing represents the most challenging aspect of home waxing and should only be attempted after mastering other areas.
Preparation Importance: Extra preparation is crucial for this sensitive area. Consider the comprehensive guidance in our bikini waxing preparation guide.
Hard Wax Necessity: Always use hard wax for bikini areas due to the sensitive skin and coarse hair.
Professional Consideration: Many people prefer professional services for this area, especially for more extensive styles. Learn about different bikini waxing styles to understand your options.
Safety Priority: Never attempt areas you cannot see clearly or reach comfortably. When in doubt, seek professional help.
Temperature Control and Safety
Understanding Wax Temperature
Proper temperature control is perhaps the most critical aspect of safe home waxing. Wax that’s too hot can cause burns, while wax that’s too cool won’t effectively remove hair.
Optimal Temperature Ranges:
- Soft Wax: Should spread like warm honey, approximately 125-135°F (52-57°C)
- Hard Wax: Slightly warmer than soft wax, approximately 130-140°F (54-60°C)
- Strip Wax: Room temperature activation, no heating required
Testing Methods: Always test wax temperature on the inside of your wrist before applying to the target area. The wax should feel warm but comfortable.
Heating Guidelines: If using a microwave to heat wax, do so in 15-30 second intervals, stirring between each heating. Never heat wax for extended periods, as this can create dangerous hot spots.
Safety Protocols
Burn Prevention: Keep a bowl of cool water nearby in case of accidental contact with too-hot wax. Never apply ice directly to wax burns, as this can cause the wax to harden and become more difficult to remove.
Equipment Safety: Regularly inspect your wax warmer for damage and replace if necessary. Never leave heating equipment unattended.
Skin Assessment: Before each session, check your skin for cuts, rashes, sunburn, or other irritations that would contraindicate waxing.
Emergency Procedures: Know how to handle common issues like wax stuck to skin (use oil to dissolve), minor burns (cool water and aloe vera), and allergic reactions (discontinue use and seek medical attention if severe).
Common Mistakes and How to Avoid Them
Application Errors
Mistake: Applying Wax Too Thick or Too Thin
- Problem: Thick soft wax is difficult to remove and wastes product. Thin application doesn’t grip hair effectively.
- Solution: Practice achieving the right consistency – you should be able to see through soft wax but not see skin texture.
Mistake: Working in Sections Too Large
- Problem: Large sections are difficult to remove in one motion and may result in incomplete hair removal.
- Solution: Limit sections to 2-3 inches maximum. It’s better to do more small sections than struggle with large ones.
Mistake: Incorrect Hair Growth Direction Assessment
- Problem: Applying wax against hair growth or removing in the wrong direction reduces effectiveness.
- Solution: Take time to observe hair growth patterns before beginning. Hair doesn’t always grow in obvious directions.
Temperature and Timing Issues
Mistake: Inconsistent Wax Temperature
- Problem: Temperature variations lead to inconsistent results and potential safety issues.
- Solution: Use a quality wax warmer with temperature control, and test temperature before each application.
Mistake: Removing Hard Wax Too Soon or Too Late
- Problem: Wax that’s not properly set won’t remove cleanly, while overly hardened wax can be difficult to remove.
- Solution: Learn to recognize the proper consistency – firm but flexible, not brittle.
Mistake: Hesitant or Slow Removal
- Problem: Slow removal increases pain and reduces effectiveness.
- Solution: Build confidence through practice on less sensitive areas. Quick, decisive removal is always better.
Preparation and Aftercare Oversights
Mistake: Inadequate Skin Preparation
- Problem: Oils, lotions, or moisture on skin reduce wax adhesion.
- Solution: Always cleanse thoroughly and ensure skin is completely dry before waxing.
Mistake: Neglecting Post-Wax Care
- Problem: Can lead to irritation, ingrown hairs, and discomfort.
- Solution: Immediately apply soothing products and follow proper aftercare protocols.
Professional Tips for Better Results
Technique Refinement
Skin Tension Management: Always keep skin taut during removal. Use your non-dominant hand to pull skin tight while removing wax with your dominant hand.
Speed and Confidence: Quick, confident removal is more effective and less painful than hesitant attempts. Practice building this confidence on less sensitive areas first.
Clean Technique: Keep your workspace organized and clean. Wipe spatulas between applications and maintain hygiene throughout the process.
Pattern Recognition: Learn to read hair growth patterns in different body areas. These patterns can vary significantly between individuals and even between different areas on the same person.
Quality Enhancement Strategies
Product Quality Investment: Higher-quality waxes and tools produce better results and are often more cost-effective in the long run. The Ajoura Wax Beans represent professional-grade quality for home use.
Multiple Wax Types: Different areas benefit from different wax types. Don’t try to use one wax for everything – match the product to the specific area and hair type.
Tool Specialization: Use different spatula sizes for different areas. Small spatulas for precision work, larger ones for efficient coverage of big areas.
Environmental Optimization: Good lighting, comfortable temperature, and adequate space all contribute to better results.
Building Skills Progressively
Start Simple: Begin with easy areas like lower legs before advancing to more challenging zones.
Practice Consistency: Regular practice builds muscle memory and confidence. Don’t attempt complex areas until you’ve mastered basic techniques.
Learn from Mistakes: Each session teaches valuable lessons. Keep notes about what works and what doesn’t for future reference.
Seek Education: Consider watching professional tutorials or even taking a basic esthetics class to learn proper techniques.
Post-Wax Care and Maintenance
Immediate Aftercare (First 24 Hours)
Soothing Application: Immediately after waxing, apply a soothing product like aloe vera gel, which helps calm irritation and reduce redness. Many commercial post-wax products contain beneficial ingredients like chamomile or tea tree oil.
Cooling Treatment: Cool (not cold) compresses can help reduce inflammation and provide comfort. Avoid ice, which can be too harsh for freshly waxed skin.
Avoid Heat and Friction: Skip hot showers, saunas, steam rooms, and intense exercise for 24 hours. Heat can increase irritation and inflammation.
Gentle Cleansing: Use mild, fragrance-free cleansers. Avoid scrubbing or using harsh products on freshly waxed areas.
Loose Clothing: Wear loose, breathable clothing to prevent friction and allow air circulation around waxed areas.
Long-Term Skin Care
Exfoliation Schedule: Begin gentle exfoliation 48-72 hours after waxing to prevent ingrown hairs. Use a gentle scrub or exfoliating mitt 2-3 times per week.
Moisturizing Routine: Daily moisturizing keeps skin healthy and can help extend the smoothness between waxing sessions. Choose non-comedogenic products that won’t clog pores.
Ingrown Hair Prevention: Use products containing salicylic acid or glycolic acid to help prevent ingrown hairs. Apply these 2-3 days after waxing, not immediately.
Sun Protection: Freshly waxed skin is more sensitive to sun exposure. Use broad-spectrum sunscreen and limit sun exposure for several days after waxing.
Maintenance Schedule
Regular Waxing Intervals: Most people find that waxing every 4-6 weeks maintains optimal results. Consistency helps weaken hair follicles over time.
Seasonal Adjustments: You may need to adjust your schedule based on seasonal hair growth patterns and your activity level.
Touch-Up Strategy: Learn to do small touch-ups between full sessions for areas that grow faster or were missed during the main session.
Troubleshooting Common Issues
Incomplete Hair Removal
Cause Analysis: Usually results from incorrect hair length, improper wax temperature, or poor technique.
Immediate Solutions:
- Check remaining hair length – if too short, wait for growth
- Verify wax temperature and consistency
- Ensure skin is properly prepared and dry
- Consider switching wax types for stubborn areas
Prevention Strategies:
- Maintain consistent waxing schedules
- Use appropriate wax types for different hair textures
- Improve application and removal techniques through practice
Skin Irritation and Reactions
Normal vs. Concerning Reactions: Some redness and sensitivity is normal and should subside within 24 hours. Seek medical attention for severe reactions, persistent swelling, or signs of infection.
Immediate Treatment:
- Apply cool, soothing products like aloe vera
- Avoid further irritation from heat, friction, or harsh products
- Consider anti-inflammatory medications if appropriate
Future Prevention:
- Perform patch tests with new products
- Choose gentler wax formulations
- Improve technique to reduce skin trauma
- Consider professional treatment for very sensitive areas
Wax Residue Removal
Safe Removal Methods: Never try to scrape or pick off wax residue. Use oil-based products (baby oil, coconut oil, or commercial wax removers) to dissolve remaining wax.
Cleaning Process: Apply oil generously to the area, let it sit for several minutes, then gently massage and wipe away with a soft cloth.
Prevention Techniques: Proper application and removal techniques reduce the likelihood of residue. Ensure wax is at the correct temperature and consistency.
Comparing Home vs. Professional Waxing
Advantages of Home Waxing
Privacy and Comfort: Many people feel more comfortable waxing at home, especially for intimate areas. You control the environment, timing, and privacy level.
Cost Effectiveness: After the initial equipment investment, home waxing costs significantly less than regular salon visits. A quality kit like the GiGi Brazilian Waxing Kit pays for itself after just a few uses.
Convenience and Scheduling: No appointment scheduling, travel time, or waiting. You can wax whenever it’s convenient for your schedule.
Product Control: You choose exactly which products to use, allowing you to avoid ingredients that irritate your skin or select specific formulations you prefer.
When to Consider Professional Services
Complex Areas: Areas that are difficult to reach or see clearly may be better handled by professionals, especially when you’re learning.
Sensitive Skin: If you have very sensitive skin or a history of reactions, professional estheticians can provide safer treatment.
Special Occasions: For important events, professional services can provide extra assurance of optimal results.
Learning Opportunity: Occasional professional sessions can help you observe proper techniques and learn new skills.
Making the Decision
The choice between DIY waxing and salon services depends on your comfort level, budget, skill development, and specific needs. Many people use a combination approach – handling most areas at home while getting professional help for challenging zones.
Advanced Home Waxing Techniques
Multi-Area Sessions
Planning and Timing: When waxing multiple areas in one session, plan your sequence strategically. Start with less sensitive areas to build confidence, and save the most challenging areas for when you’re warmed up but not yet tired.
Energy Management: Waxing can be physically demanding. Take breaks between areas to maintain focus and technique quality.
Supply Management: Ensure you have adequate supplies for extended sessions. Running out of strips or wax mid-session can disrupt your rhythm and results.
Precision Techniques
Detail Work: For precise shaping (like eyebrow arching), use small amounts of hard wax and work slowly and methodically.
Clean Lines: Creating clean edges requires practice and steady hands. Mark desired lines with a washable pencil before waxing.
Symmetry Achievement: For paired areas (eyebrows, bikini lines), work on both sides progressively rather than completing one side entirely before starting the other.
Efficiency Optimization
Setup Streamlining: Develop a standard setup routine that ensures everything you need is within reach and properly prepared.
Technique Standardization: Develop consistent patterns and techniques that work well for your body and preferences.
Time Management: Track how long different areas take to complete, helping you plan adequate time for future sessions.
Building Confidence and Skill
Progressive Skill Development
Beginner Areas: Start with lower legs, which are forgiving and easy to reach. Build confidence and technique before moving to more challenging areas.
Intermediate Progression: Move to arms and underarms once you’ve mastered basic application and removal techniques.
Advanced Areas: Only attempt facial and intimate areas after becoming proficient with other body areas.
Practice Strategies
Regular Sessions: Consistent practice builds muscle memory and confidence more effectively than sporadic attempts.
Technique Focus: Focus on perfecting one aspect at a time – application, removal, or aftercare – rather than trying to improve everything simultaneously.
Results Documentation: Take before and after photos (for your own reference) to track improvement in technique and results.
Overcoming Common Fears
Pain Management: Pain typically decreases with experience as you develop better technique and your skin adapts to the process.
Mistake Recovery: Learn to fix common mistakes rather than starting over. Most issues can be corrected with proper technique.
Confidence Building: Remember that even professionals made mistakes when learning. Each session builds valuable experience.
Product Recommendations and Shopping Guide
Essential Products for Beginners
Complete Starter Kit: The Tikesi Waxing Kit provides everything needed for beginners, including multiple wax types, heating equipment, and comprehensive instructions.
Backup Options: Keep ready-to-use strips on hand for quick touch-ups or when you don’t want to heat wax.
Aftercare Essentials: Invest in quality soothing products – they’re as important as the wax itself for good results.
Upgrading Your Equipment
Professional Warmers: As you gain experience, investing in a quality digital wax warmer improves consistency and safety.
Specialized Waxes: Try different formulations to find what works best for your skin and hair type.
Tool Quality: Higher-quality spatulas and strips provide better control and more consistent results.
Budget Considerations
Initial Investment: Quality equipment costs more upfront but provides better results and safety, making it worthwhile for regular users.
Long-Term Savings: Calculate the cost per session compared to salon treatments – home waxing typically pays for itself within a few months.
Gradual Building: You don’t need everything at once. Start with basics and add specialized tools and products as you gain experience.
Seasonal and Special Considerations
Seasonal Adaptations
Summer Preparation: Increase waxing frequency before beach season, but avoid waxing immediately before sun exposure.
Winter Maintenance: Some people reduce waxing frequency in winter when areas are covered, but maintaining consistency yields better long-term results.
Holiday Timing: Plan special occasion waxing 2-3 days before events to allow any redness to subside.
Special Circumstances
Travel Waxing: Pack travel-sized aftercare products and consider timing sessions to avoid post-wax sensitivity during travel.
Exercise Coordination: Avoid intense workouts for 24-48 hours after waxing to prevent excessive sweating in sensitive areas.
Medical Considerations: Consult healthcare providers about waxing if you take medications that affect skin sensitivity or healing.
Hormonal Considerations
Menstrual Cycle Timing: Many women find waxing more comfortable during certain times of their cycle due to hormonal pain sensitivity variations.
Pregnancy Considerations: Pregnancy can increase skin sensitivity. Some pregnant women find waxing more uncomfortable, while others notice no difference.
Age-Related Changes: Skin sensitivity and hair growth patterns may change with age, requiring technique or product adjustments.
Long-Term Success Strategies
Developing Your Routine
Consistency is Key: Regular waxing intervals maintain the best results and gradually weaken hair follicles, making future sessions easier.
Seasonal Planning: Develop annual routines that account for your lifestyle, activities, and clothing choices throughout the year.
Continuous Learning: Stay informed about new products, techniques, and safety information to continuously improve your results.
Maintaining Equipment
Cleanliness Standards: Keep all equipment scrupulously clean to prevent infections and maintain hygiene standards.
Regular Replacement: Replace worn tools and expired products to ensure optimal performance and safety.
Storage Solutions: Proper storage extends product life and maintains equipment functionality.
Building Expertise
Advanced Techniques: As you gain experience, explore advanced techniques like professional-level bikini styling or precision facial work.
Product Experimentation: Try different brands and formulations to find optimal combinations for your needs.
Sharing Knowledge: Consider helping friends or family members learn, which reinforces your own skills and knowledge.
Conclusion: Mastering Home Waxing for Long-Term Success
Learning how to use wax hair removal at home effectively requires patience, practice, and attention to detail, but the rewards of smooth, long-lasting results and significant cost savings make the effort worthwhile. By following proper techniques, maintaining safety protocols, and building skills progressively, you can achieve professional-quality results from the comfort and privacy of your own home.
The key to successful home waxing lies in understanding that each person’s skin and hair are unique, requiring some experimentation to find the optimal combination of products, techniques, and schedules. Start with basic areas and simple techniques, building confidence and skills before advancing to more challenging areas or complex procedures.
Remember that consistency in your waxing routine produces the best long-term results. Regular sessions not only maintain smooth skin but also gradually weaken hair follicles, making future treatments easier and more comfortable. The initial learning curve pays dividends in improved technique, reduced discomfort, and better results over time.
Safety should always remain your top priority. Proper temperature control, hygiene protocols, and skin assessment prevent most complications and ensure positive experiences. When in doubt, seek professional guidance or treatment rather than risking injury or poor results.
As you develop your home waxing skills, don’t hesitate to complement your routine with professional treatments when appropriate. Many experienced home waxers use professional services for particularly challenging areas while handling routine maintenance at home, creating a balanced approach that maximizes both results and cost-effectiveness.
The investment in learning proper home waxing techniques pays lifelong dividends in smooth, confident skin and the freedom to maintain your grooming routine on your own terms. With patience, practice, and the right approach, you can master this valuable skill and enjoy all the benefits that effective home waxing provides.
Ready to start your home waxing journey? Explore our complete guide to choosing the best wax products and discover professional waxing kits perfect for beginners. For more comprehensive hair removal guidance, visit our complete hair removal resource center.
Related Guides: